Showing posts with label preserves. Show all posts

Monday, July 7, 2014

Week One 2014: How to make the most of your Greens

The first share is here. And, like most early season CSA shares, it is full of delicious green stuff.

Like this
Members will receive the following this week: Kale, Lettuce (either leaf or head, depending on supply), radishes, beets, braising mix, a choice of fresh herbs, and scallions or garlic scapes.

That should all be pretty familiar to returning members, but not all members are returning members. So bear with me while I dish out some details on those items that require them.

First, the beets.


In years past we have started early beets in our hoophouse. This year our hoophouse is brimming with extremely productive tomatoes.

Even Scott is impressed by how well the tomatoes are doing.
So, for the first time, we started an early round of beets as transplants in the greenhouse. The experiment appears to have gone well (as evidenced by the beet photo above) but we didn't start a ton of them so they will be a fleeting pleasure until the late beets come in. If you want to savor them, I suggest the early beet recipe from 2012 (click here). And don't forget to eat the greens! More on that below.

Braising mix will be new to some folks. It's a mix of cooking greens. It can be eaten as a salad by those with adventurous taste buds, but most members find they prefer the assertive flavors of braising mix in stir fries, soups, or other traditional cooked greens recipes. This week's mix will include baby chard, mizuna, dandelion, and orach. If you are itching to know which is which, you can find a list of the various greens we grow (with photos) here. If you want a plethora of ideas for using your greens, including some from the blog and some from other sources, check out the Wintergreen Farm braising mix Pinterest board

The last item that requires comment is the optional garlic scapes. If you haven't seen them before, you are in for a treat. Their curl-i-que growth is lots of fun and they taste like garlicky scallions. What's not to love? Chop them up as you would chop scallions and use them in any recipe in place of garlic or scallions.

Since three of the share items are straight up greens (lettuce, kale, and braising mix) and two of the items (beets and radishes) are sprouting delicious bonus greens (yes, radish greens are edible--we like them best cooked. Add them to your braising mix!) you might be wondering what to do if the abundance of greens this week gets ahead of you.

Freeze them.

It's fast and works with any cooking green (I suppose you could freeze lettuce, but why?). Don't forget about your beet and radish greens, they fit in perfectly with the braising mix and roots will last longer if you top them. The greens pull moisture out of the roots even while they are in the fridge.

This is how I do it. I used a bunch of farmer kale (which means kale that the caterpillars got to) for the photo-tutorial so please pardon the holes. Also pardon the blurry photos. It's challenging to photograph my own actions :)
Be sure you start by washing your greens well. Swish
them around in a sink or bowl full of water, then let
them sit for a moment so dirt can settle to the bottom.
This eliminates lingering grit.
Chop them up.
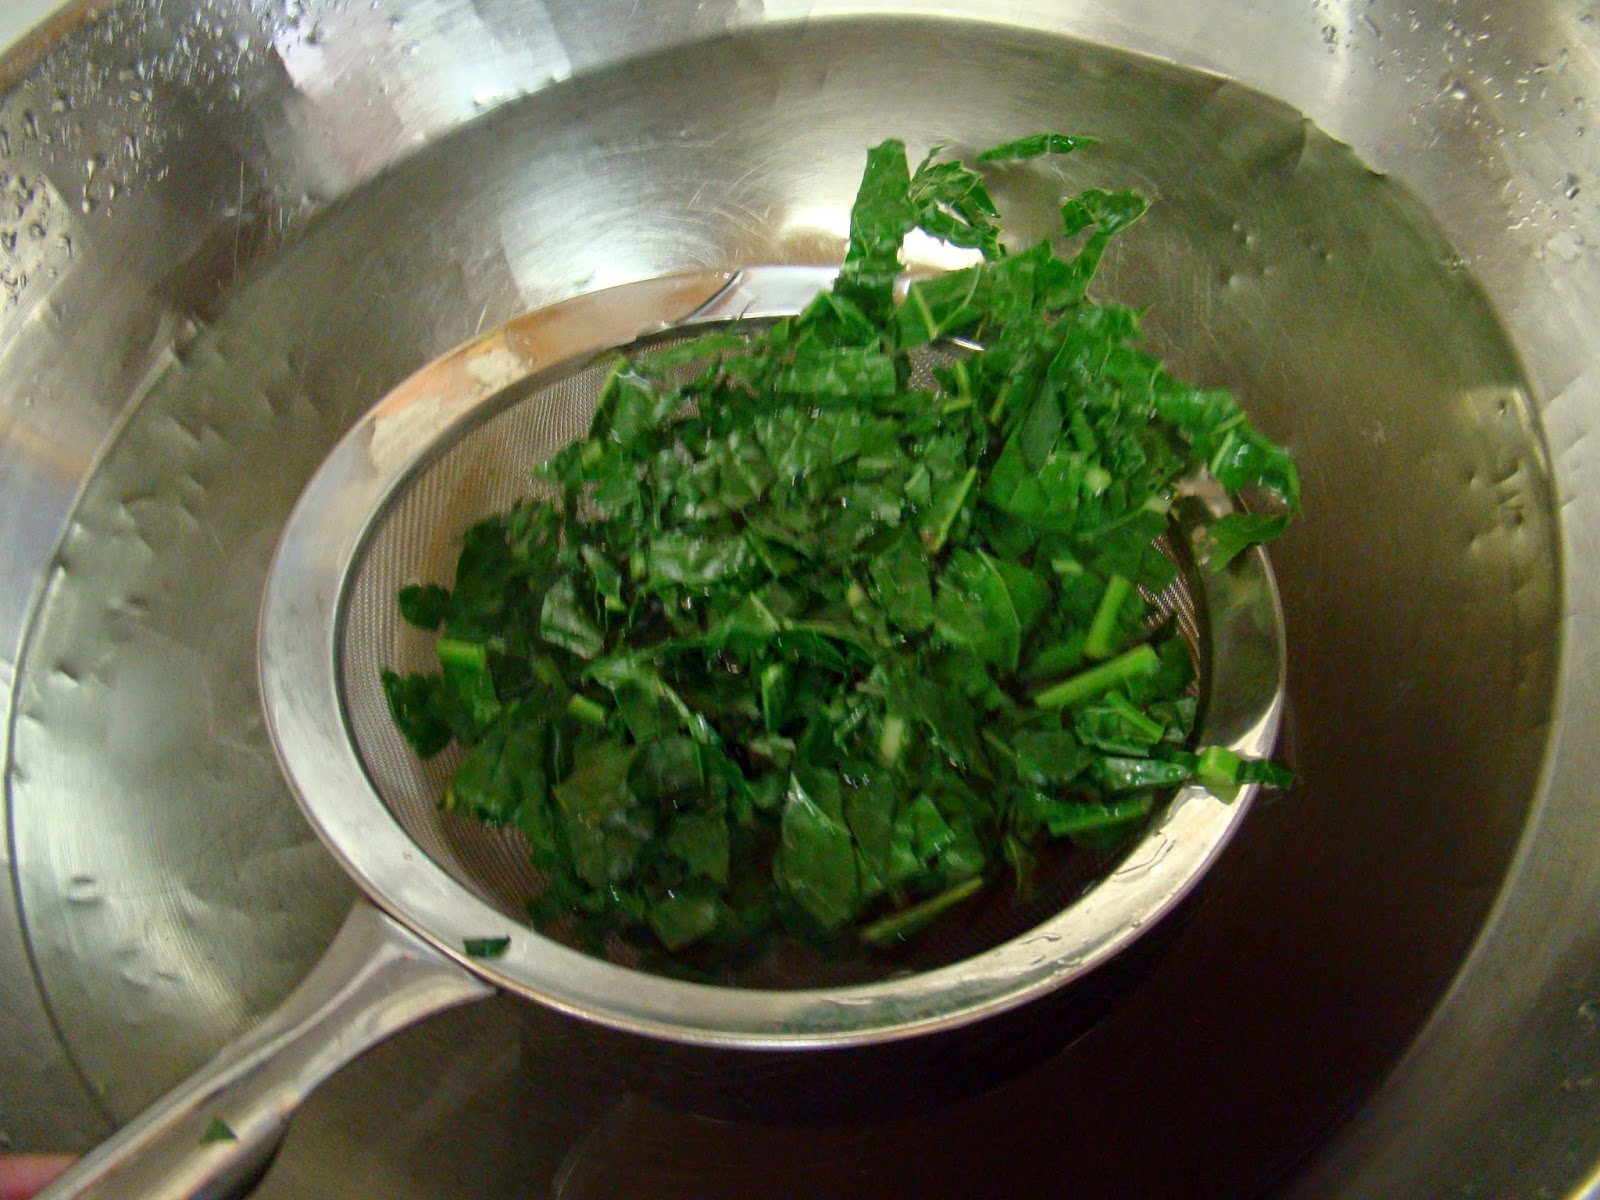
Blanch the greens by dipping them very quickly into a
pan of boiling water. A stainless steel sieve works well for this.
Be forewarned, your camera lens will steam up at this point.

Dip them in cold water to stop the cooking. Notice how
bright green they are now. This only took a couple seconds
in boiling water.
Squeeze out the water and form the greens into a ball.
Now freeze the ball as is. You can slip it in a ziploc bag or
whatever is convenient and add other extra green balls
throughout the CSA season. This winter, just grab a ball of
greens and add it to a soup, quiche, or whatever strikes your fancy.

Thursday, October 28, 2010

Eat Your Greens

A while back my friend Meghann posted this as her facebook status:

"Someday, I'm sure my children will be shocked to find out not every Mom put Kale in everything."

It made me giggle because, as a CSA farmer, the question I most frequently receive from members is "What do I do with all of this kale?" or chard, mizuna, arugula, escarole, sorrel, or whichever green things are being tucked into the shares that particular week. I have a hard time not responding with this simple statement: Eat it.

Chard growing in the morning light.
CSA fields tend to be a bit messier than home gardens,
but we still manage to grow the good stuff!

That isn't meant to be flippant. It's just that, well, that's what I do with it. In my house we munch on raw greens just because they're there, make them into salads, and add them to at least half of the dinners we cook. In fact, my family and I like greens so much that I get kind of sad when winter comes and the greens stop growing. So, not only do I eat my greens, I dry kale and chard so that I can eat even more of them later.

I know that the kale chip, oiled and seasoned kale dried for snacking, is pretty hot right now, and those are good, but I am talking about simply drying greens so that they can be added to dishes during the off season.

It is an easy process, and now is the time of year to do it. 


 I use an electric dehydrator, though you could just as easily use your stove or a solar dehydrator. We use what we have - even if it isn't the most efficient option. A solar dehydrator is certainly on our wish list...

Cut or tear the greens into small pieces and lay them out on the dehydrator tray. Space them evenly, so that they are not touching.


Dry them overnight on the lowest setting. When they are done they will look pretty much they same as they did when you started, just a little duller and more velvety, and they will be crisp.

Well dried Kale.

Crisp Rainbow Chard.


Pack the dried greens into jars, close the jars tightly, and the greens will keep all winter long.

Dried kale, ready for a season of storage.
Now that you have dried your greens, you may be left with that lingering question. "What do I do with all of this (dried) kale?" Once again, my answer is simple: Eat it.

The recipe below is almost as easy as the drying itself. It makes a hearty breakfast, a satisfying lunch, or a comforting low key dinner. It really just depends on how you look at things. You can also throw a handful of the dried greens into many of your standard dishes. I suggest starting with spaghetti sauce. Once you see how tasty that is, go from there. Be extremely creative.

This can also be made with one or two leaves of fresh kale or chard cut into bite sized pieces.

Oatmeal with Dried Greens, Chicken Stock, and Root Vegetables

  • One cup steel cut oats 
  • One cup thinly cut root vegetables - I used carrots for this version because our neighbor had dropped a bunch off for us (look how huge!). Celeriac and parsnips are also divine here.
  • 1/2 cup crumbled dried kale or chard, plus more for serving
  • 2 1/2 cups chicken stock -  Vegetable stock or water works too if you want to go vegetarian.
  • Salt and pepper to taste


  1. Bring the stock or water to a boil in a small saucepan.
  2. Stir in all of the other ingredients.
  3. Turn the heat down to simmer, cover the pot, and simmer, stirring occasionally, until the oatmeal is fully cooked. Cooking time will vary depending on the oats and your personal texture preferences. 
  4. Add salt and pepper to taste.
  5. Spoon the oatmeal into serving bowls and top with additional crumbled dried greens.

It may not be that photogenic, but it is highly tasty and oh so comforting.

Friday, October 15, 2010

The most frustrating thing about farming

I've been really into taking pictures of things in pots lately. It must be all of the canning I am doing. It is the season for preserving the harvest.

The last pan of 2010 tomatoes - about to be sauced
Living seasonally is one of the most romantic things about farming. The time of year dictates our activities as farmers in a way that just doesn't happen much in modern life. It is one of the many things that I truly love about farming.

And also the thing that I most hate.

Living seasonally doesn't just mean that my life is tied to my environment, that I can live my respect for nature, and that I get to eat really well. Though, happily, those things are true. It means that I only get one go at things each year. One shot. So, as an optimistic 30 year old, living seasonally means I will only have - at most - 50 to 60 more tries at this.

My husband and I are constantly thinking about ways to make our farm better. He creates files about cultivation methods. I obsess over the best variety of shell bean to grow in our area. We both ponder sources for soil inputs, marketing methods, and the best way to grow a lot of tasty tomatoes. Each year we make a plan. We try to get it right. Of course there are always failures, big and small. We always end up with a big list of things to do differently next year.

50 tries probably sounds like a lot, but it isn't. Imagine that you only get 50 tries to get your life's passion right. A chef might cook the same dish, a pitcher practice the same pitch, a singer sing the same song countless times, until those actions are as natural as breathing.  A farmer only gets to live each season once, and there are only so many seasons in a lifetime.

Which is why it is such a pain in the butt when, as a farmer, you screw something up. Like I did last night. Actually, I suppose this screw up was more in my role as farmer's wife rather than as farmer because it was a failure in the kitchen and not the field, but I have plenty of both.

I had been saving the last of the blueberries we picked this year in our freezer to make a batch of blueberry basil jam, something I sell at the local farmers' market, just for us. Then I had a brilliant idea for something new to try with the blueberries, blueberry green tomato relish. It started out nicely...(more pictures of things in pots here)


Looks pretty...


Tastes good too.

And then it experienced a melt down. Literally. I went in the living room to hang out with my daughter while the pot simmered on the stove to allow the tomatoes to soften. A few minutes later, my husband called from the kitchen "This stuff is really boiling in here." We had a little chat about it. He stirred, turned down the heat, we called it good. When I returned, the blueberries and chunks of onion were disintegrated and, though the flavor of the relish was pretty good, it wasn't a relish. It had turned into a sort of thin blueberry ketchup with strangely large hunks of, nicely softened, green tomato throughout.

It wasn't a catastrophic failure, but I'm not sure how I'll use
up six pints of it.

I can think of a number of ways that this recipe went wrong. I used a bit too much vinegar, the wrong blueberry/tomato ratio, chopped the onions too fine and the tomatoes too large, and I obviously over cooked it. Plus I just realized that I should have added some fresh ginger. I'm sure that I could make another, better, batch of it right now. But I can't. I have to wait through the seasons before I can get my hands on more blueberries and green tomatoes.

My daughter, helping me photograph green tomatoes for the anticipated version of this post in which the relish turned out perfectly and we all lived happily ever after.

Tuesday, October 12, 2010

Spiced Root Vegetable Conserve

I like to create flavor combinations that raise eyebrows until they are tasted - and the taster's face mellows into a soft and satisfied grin. Honestly though, I didn't think that I was doing that with this conserve. This combination of flavors seemed like a no brainer to me. Sweet/tart apples and dried cherries, earthy carrots and parsnips, buttery pecans, and a healthy dose of warm spices. All the goodness of autumn in one place. Sort of like carrot cake in a jar without the need for cream cheese frosting.


So I was surprised when I placed the nicely labeled jars on the Wintergreen Farm table at the Ontonagon County Harvest Festival and they were greeted with more than a few pairs of raised eyebrows. Still, those brave enough to taste the contents did find themselves grinning in satisfaction.

Try it yourself and see what happens.

Spiced Root Vegetable Conserve

Makes about five 8 ounce jars.
  • 1/2 cinnamon stick
  • about 1/4 of a nutmeg nut
  • 2 whole cloves
  • 10 black peppercorns
  • 2 cups water
  • 2 cups sugar - I use "evaporated cane juice" and I do think it's tastier, plus it's fair trade and organic
  • 1 pound carrots, cut into uniform small dice
  • 1/4 pound parsnips, cut into uniform small dice
  • 3 medium tart apples, peeled and cut into 1 to 1 1/2 inch chunks
  • 1/2 cup pecan halves
  • 1/2 cup dried tart cherries
  1. Place the spices in a small spice bag and crush them lightly with a mortar and pestle or rolling pin.
  2. In a medium sized, heavy bottomed sauce pan bring the water, sugar, and spices (still in the spice bag) to a simmer.
  3. Add the carrots and parsnips to the syrup and simmer until they are just tender.
  4. Add the apples and continue to simmer until the apples are beginning to turn translucent at the edges.
  5. Stir in the pecans and cherries and remove the pan from the heat.
  6. Remove the spice bag, ladle the conserve into jars that have been prepared for canning.  Be sure to stir well as you fill the jars because the cherries tend to sink to the bottom of the pan.
  7. Seal and process in a boiling water bath for ten minutes. 


My daughter taking a break from her toys to taste some finished conserve. She smiled just after this.